TWD: Russian Grandmother’s Apple Pie-Cake
My weeks seem to fly by now that they are marked by my Tuesday TWD blog entries and recently, I feel like all I’m doing is looking forward to my weekend baking and Tuesday blogging…not that there’s anything wrong with that….

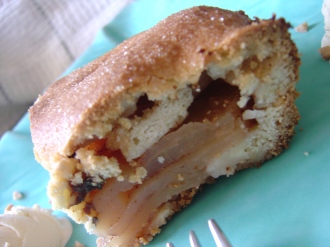
So this week’s recipe comes from Natalie over at Burned Bits. Natalie, I must say that this was a great choice!! This was an easy recipe to put together and turned out simply delicious (not deliciouso!). I halved most of the recipe; the only part I did not halve was the cinnamon and sugar mixture. We like our apple desserts sweet and I knew that half of the original amount would not be enough to cut through some of the apple tartness. Since I baked the pie-cake in an 8×8 inch Pyrex dish, you would think I cut the baking time down but ummm…well, I didn’t. I baked it for 65 minutes and covered it with aluminum foil during the final 25 minutes after I realized that it was browning too quickly. Surprisingly, it wasn’t overcooked but next time I’ll remember to adjust the baking time so as to avoid any potential mishaps. Oh, and just to note, I slit the top as instructed but since Dorie speaks of the dough as being “self-healing” the slits self-healed themselves and I wasn’t able to gauge doneness by checking if the apple filling was bubbling up through the slits – I’m sure I wasn’t the only one who came across this issue either.

I know that some of my fellow TWDers had a fair amount of trouble with the dough being sticky and mostly likely with the help of a miracle, my dough wasn’t at all sticky. It was soft, yes, which is what Dorie said it would be like and I did have to use all of the flour the recipe called for but sticky it was not. Thank goodness. I have to admit that I was nervous about the dough turning into cake though. I mean, when you bake a cake, you use batter not dough but I suppose there was enough baking powder (1/2 tbsp for me) in the recipe to cause the dough to rise enough so it was a relief when I took my first bite. SO GOOD!! A beautiful combination of apple pie and well…cake. 🙂 I served the pie-cake with vanilla ice cream and dropped a few Heath toffee bits on top of the ice cream to add a little texture.
To see how everyone else did with their pie-cake this week, check out the growing blogroll on Tuesdays with Dorie.
—–
Recent TWD Recipes: Snickery Squares, Pecan Sour Cream Biscuits, Almost-Fudge Gâteau
Next Week’s TWD Recipe: Brioche Raisin Snails as chosen by Culinary Concoctions by Peabody
—–
Russian Grandmother’s Apple Pie-Cake
source: Dorie Greenspan, Baking: From My Home to Yours
For The Dough
- 2 sticks (8 ounces) unsalted butter, at room temperature
- 1 cup sugar
- 2 large eggs
- 1 tablespoon baking powder
- 1/2 teaspoon salt
- Juice of 1 lemon
- 3 1/4 – 3 1/2 cups all-purpose flour
For The Apples
- 10 medium apples, all one kind or a mix (I like to use Fuji, Golden Delicious and Ida Reds; my grandmother probably used dry baking apples like Cordland and Rome) (I used Gala)
- Squirt of fresh lemon juice
- 1 cup moist, plump raisins (dark or golden)
- 1/4 cup sugar
- 1 1/4 tsp ground cinnamon
- Sugar, preferably decorating (coarse) sugar, for dusting
To Make The Dough:
- Working with a stand mixer, preferably fitted with a paddle attachment, or with a hand mixer in a large bowl, beat the butter and sugar together on medium speed until smooth, about 2 minutes. Add the eggs and continue to beat until the mixture is light and fluffy, about 3 minutes more. Reduce the mixer speed to low, add the baking powder and salt and mix just to combine. Add the lemon juice – the dough will probably curdle, but don’t worry about it. Still working on low speed, slowly but steadily add 3 1/4 cups of the flour, mixing to incorporate it and scraping down the bowl as needed. The dough is meant to be soft, but if you think it looks more like a batter than a dough at this point, add the extra 1/4 cup flour. (The dough usually needs the extra flour.) When properly combined, the dough should almost clean the sides of the bowl.
- Turn the dough out onto a work surface, gather it into a ball and divide it in half. Shape each half into a rectangle. Wrap the dough in plastic wrap and refrigerate for at least 2 hours, or for up to 3 days. (The dough can be wrapped airtight and frozen for up to 2 months; defrost overnight in the refrigerator.)
To Make The Apples: Peel and core the apples and cut into slices about 1/4 inch thick; cut the slices in half crosswise if you want. Toss the slices in a bowl with a little lemon juice – even with the juice, the apples may turn brown, but that’s fine – and add the raisins. Mix the sugar and cinnamon together, sprinkle over the apples and stir to coat evenly. Taste an apple and add more sugar, cinnamon, and/or lemon juice if you like.
Getting Ready to Bake:
- Center a rack in the oven and preheat the oven to 375 degrees F. Generously butter a 9×12-inch baking pan (Pyrex is good) and place it on a baking shee tlined with parchment or a silicone mat.
- Remove the dough from the fridge. If it is too hard to roll and it cracks, either let it sit at room temperature for about 15 minutes or give it a few bashes with your rolling pin to get it moving. Once it’s a little more malleable, you’ve got a few choices. You can roll it on a well-floured work surface or roll it between sheets of plastic wrap or wax paper. You can even press or roll out pieces of the dough and patch them together in the pan – because of the baking powder in the dough, it will puff and self-heal under the oven’s heat. Roll the dough out until it is just a little larger all around than your pan and about 1/4 inch thick – you don’t want the dough to be too thin, because you really want to taste it. Transfer the dough to the pan. If the dough comes up the sides of the pan, that’s fine; if it doesn’t that’s fine too.
- Give the apples another toss in the bowl, then turn them into the pan and, using your hands, spread them evenely across the bottom.
- Roll out the second piece of dough and position it over the apples. Cut the dough so you’ve got a 1/4 to 1/2 inch overhang and tuck the excess into the sides of the pan, as though you were making a bed. (If you don’t have that much overhang, just press what you’ve got against the sides of the pan.)
- Brush the top of the dough lightly with water and sprinkle sugar over the dough. Using a small sharp knife, cut 6 to 8 evenly spaced slits in the dough.
- Bake for 65 to 80 minutes, or until the dough is a nice golden brown and the juices from the apples are bubbling up through the slits. Transfer the baking pan to a cooling rack and cool to just warm or to room temperature. You’ll be tempted to taste it sooner, but I think the dough needs a little time to rest.


The top of your pie-cake looks gorgeous! My slits “self-healed” as well.
I ate mine with ice cream too! Soooo good!
Your pie-cake looks awesome. I love how your made little rings instead of slices. Gorgeous!
Looks absolutely delicious! And you have made my day!
http://culinaryinfatuation.blogspot.com
Your pics are magazine perfect! The toffee bits on the top sound WONDERFUL!! Great idea!
The top looks so cute!
We had custard, until know you are the only one with apple rings 🙂
I meant until now, great work!
Well done! Your pie/cake looks delicious!
I feel the same way. I think my new favorite day is Tuesday. Your pie-cake looks so yummy. I love the circular apple slices… Great job! 🙂
-Clara
http://iheartfood4thought.wordpress.com
I love the way your sliced your apples and your crust is simply gorgeous!
Looks perfect! I love the way you sliced your apples too. Beautifully done!
Looks delicious! I love the way your apples look ad your crust looks wonderful!
I like the way you sliced your apples. Your pie-cake looks amazing!
Your pie-cake looks delicious. I could tell at a glance from just the top that you did apple rings. I guess mine was one of the few, if not only one, that bubbled as predicted.
Looks great! And that turquoise plate is awesome too!
Love the sliced apples! They really make for a very pretty slice of pie. It looks like it tastes wonderful! Great job!
Your top crust is truly beautiful
Gorgeous, and I’m so glad you liked it!
I feel like I’m structuring my whole week around TWD, but I love it 🙂
Wow, Tara! I’ve read too many of these TWD updated in my Google Reader and this is definitely the prettiest version I’ve seen. Yum! Oh, and You Make My Day back! http://annieseats.wordpress.com/2008/03/11/you-all-make-my-day/
I adore how the top came out with all the browned circles, that just looks adorable. Great job with this, it looks super-tasty!
Thanks everyone for the wonderful comments! I only assumed when Dorie said to peel, core and slice the apples that everyone’s pie-cake would turn out like mine and I’m really surprised to see that I’m the minority. lol Everyone else’s pie-cakes look absolutely fantastic and I’m almost finished going through the full list. Can’t wait til next week!
Ally and Annie – Thank you SO MUCH for the You Make My Day honor!!! I’m really humbled. 🙂
I love how the top of your cake looks! Must have gotten that way because you did apple rings instead of slices? My slits self healed too (that sounds really disgusting when talking about a delicious pie-cake) but I could see some bubbling on the side.
I love how the apple rings made that shape in the dough.
your dessert looks delicious. i love the way you sliced the apples. and how when you cut a slice they look layered. great!
my slits closed up as well too but i just reopened them part way through the baking process 🙂
i love how you made rings instead of slices…and your crust looks beautiful
This looks beautiful! Great job!
Welcome to The Foodie Blogroll! 🙂
For a minute, I totally thought you designed the top crust to make those perfect circles. Then I realized it was from the apple slices. My crust browned pretty quickly as well. I made the turnovers, so it browned even quicker. One way I have found to prevent overbrowning before baking time is complete is to throw a piece of foil over the area that is browning too quickly.
Oh wow that looks amazing